CSF Firewall is one of the most complete and robust iptables based firewalls in the Linux industry. It was created by ConfigServer LTD and offers a complete security suite for cPanel servers. Today we will explore how to install CSF Firewall on cPanel.
Introduction
CSF is often seen as a very advanced firewall, for this lot of newbies find it hard to configure and often prefer other simple firewall solutions when they are choosing a Linux firewall for their cPanel servers.
However, the fact that CSF is not only a firewall, but a security suite, doesn’t mean that it is hard to configure or to adapt to your needs. If you follow our CSF installation guide, I can guarantee that even if you are a novice system administrator, you will be able to configure it properly without causing any issues to your websites.
On this post, you will learn how to configure CSF and its security module LFD (Login Failure Daemon) in a basic way. This CSF installation tutorial is made for those who have a VPS, Cloud or Dedicated server with cPanel control panel.
Remove your current firewall
Removing your current firewall is the first thing you must do to begin the step by step tutorial on how to install CSF Firewall on cPanel. Apart from CSF Firewall, the 2nd most popular firewall in the web hosting industry is APF Firewall.
There are big chances that if you are using another firewall, that would be APF. To prevent conflicts because both solutions (CSF and APF) uses iptables we’d better uninstall APF first to avoid any kind of problems with their iptables rules.
If you are using another firewall rather than APF, then please make sure you follow the uninstall instructions so you can be completely sure that it is uninstalled before you continue with CSF installation.
Remove APF usign Yum
In order to install csf firewall on cpanel, first we will check if APF was installed using RPM files.
If APF Firewall was installed using yum package manager, you can uninstall it using the all mighty ‘rpm -e’ command. But first, we have to check if its installed using RPM, for this just run this command:
rpm -qa |grep -i apf
If you see something like this:
[[email protected] ~]# rpm -qa | grep apf
apf-9.7
Then that means APF was installed using an .rpm file. In order to uninstall that package you must run this command:
[[email protected] ~]# rpm -e apf-9.7
If you see this:
[[email protected] ~ ]# rpm -e apf-9.7
error: Failed dependencies:
apf >= 9.7 is needed by (installed) bfd-1.5-2.noarch
It means you have BFD (APF sister product called Brute Force Detection) installed. BFD needs to be removed before you remove APF. Run this command:
[[email protected] ~ ]# rpm -e bfd-1.5-2.noarch
Then try to uninstall APF again:
[[email protected] ~ ]# rpm -e apf-9.7
Removing APF from source
The other way to install APF firewall is using source code. It is a little bit tricky than uninstalling APF using rpm command, but it can be done if you know what you are doing.
First, before removing APF let’s stop iptables and APF service by running this commands:
/etc/init.d/iptables stop
/etc/init.d/apf stop
Remove APF installation files:
rm /etc/apf -rfv
rm /etc/cron.daily/fw -fv
rm /etc/init.d/apf -fv
Remove APF from the system boot:
chkconfig apf off
That’s all, APF Firewall should be now completely uninstalled. Now you are ready to continue with to learn how to install CSF firewall on cPanel. Follow the next steps as you see below.
Remove FirewallD
CentOS 7 comes with a new firewall installed by default, it is called firewallD. You need to disable and remove that package from your system boot process before you can continue the csf installation.
Stop firewalld
systemctl stop firewalld
Disable/Remove firewalld from the system startup
systemctl disable firewalld
Install CSF Firewall on cPanel step by step
In order to install csf firewall on cPanel we will download the .tar.gz source from configserver.com website, then we will extract.
cd /usr/local/src
wget https://download.configserver.com/csf.tgz
tar -xvpzf csf.tgz
cd csf
Run the CSF Firewall Installation script for cPanel:
sh install.cpanel.sh
CSF Firewall Port Configuration
Now this is the fun part. Let’s continue with CSF Firewall port configuration. This is by far the most critical and important part, because if you misconfigure your server ports, your traffic may be affected. So pay attention and follow my guide step by step.
There are two ways to edit CSF configuration, from the Linux shell by typing:
nano -w /etc/csf/csf.conf
Or using the WHM interface. We will be using this last one.
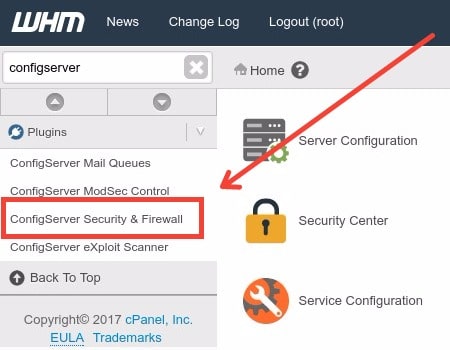
Login to WHM and at the left menu search for: “ConfigServer Security and Firewall”.

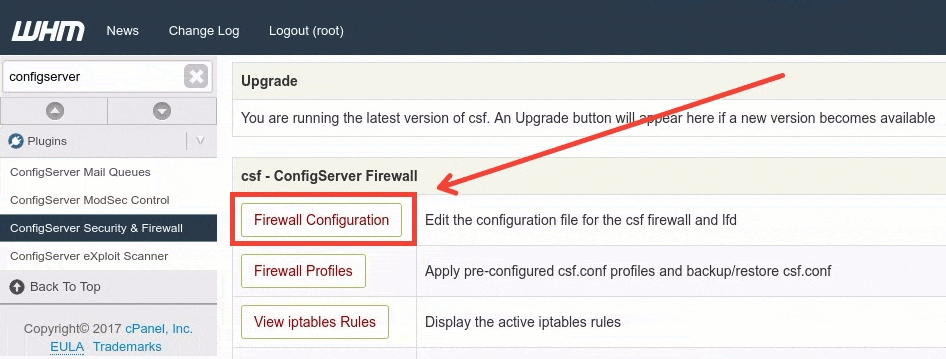
Then you will see CSF main interface. Move down until you see a button called ‘Firewall Configuration’, click on it.

This are some important variables that you need to configure:
TESTING = “1” – This is just to make sure you won’t get locked out of the server if there is a port misconfiguration. This sets a cronjob that will flush the firewall rules every 5 minutes to gain access again in case you were kicked out of the server.
RESTRICT_SYSLOG = “0” – This should be set to 0 to avoid cron conflicts and problems.
Configure TCP and UDP ports
CSF comes pre-configured to fully work on a cPanel server with all the standard cPanel Ports open, it will also auto-configure the SSH port if you are using a non-standard port. However, as I’m a little bit paranoid is my suggestion to review this manually, always:
TCP_IN = "20,21,22,25,26,53,80,110,143,443,465,587,993,995,2082,2083,2086,2087,2095,2096"
TCP_OUT = "20,21,22,25,26,37,43,53,80,81,110,143,113,443,587,993,995,2087,2089"
UDP_IN = "20,21,53"
UDP_OUT = "20,21,53"
This list assumes you have SSH service running on port 22, if you already set SSH port number to another different number, replace “22” with your real SSH port on both TCP_IN and TCP_OUT.
This is the common configuration for most cPanel servers. If you need to know more about common ports on cPanel, I suggest you to read this two articles: cPanel Ports.
Block PING requests
If you want to block ping (ICMP type 8) requests you can also set:
ICMP_IN = "0"
You won’t be able to receive ping packets from your server, except if you have a white listed IP in your allow/ignore files. We will see that later.
Disable or Enable IPV6
This is only useful if you do have IPV6 actively used in your server, then you will have to configure the same ports as you did before. Otherwise, this can be set to 0.
IPV6 = "0"
Enable SAFECHAINUPDATE
SAFECHAINUPDATE variable is used to close a window of opportunity that opens when dynamic chain updates occur. Recommended to be set to 1.
SAFECHAINUPDATE = "1"
Login Failure Blocking and Alerts
This is an important configuration that if you don’t fully understand, you can have yourself and/or your customers blocked. That’s why we will just enable SSH and FTP blocks.
LF_SSHD = "5"
LF_FTPD = "10"
LF_CPANEL = "10"
This will set a 5 and 10 times attempts to login to your services, if an attacker fails more than that number of times, it will be blocked.
LF_SSHD_PERM = "1"
LF_FTPD_PERM = "1"
LF_CPANEL_PERM = "1"
This makes the block permanently, which is recommended.
The same applies to the rest of the protocols, which I recommend you to set to 0 because this are not really important protocols, and often cause lot of false positives and legitimate blocks against your cPanel users. Only activate if you know what you are doing, and set a large number to avoid massive blocks.
LF_EXIMSYNTAX = "0"
LF_SMTPAUTH = "0"
LF_POP3D = "0"
LF_IMAPD = "0"
LF_HTACCESS = "0"
LF_MODSEC = "0"
Whitelist your IPs
Edit this files from the Linux shell by typing:
nano -w /etc/csf/csf.allow /etc/csf/csf.ignore
Or using WHM interface:
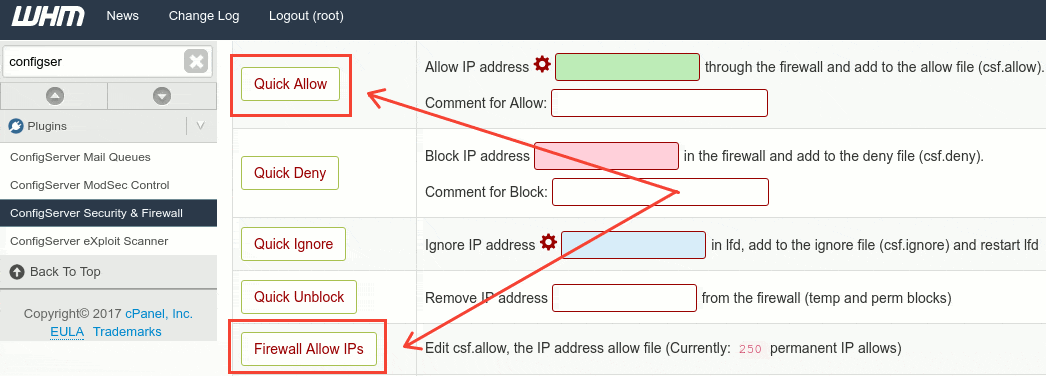
WHM » Plugins » ConfigServer Security and Firewall » Firewall Allow IPs

You can specify as many IPs as you like, just make sure this are static IPs, this can be for example the static IP of your office, or the IP of your remote web developer, as you see in the example below.
# Local Office
111.111.111.111

# Remove developer
222.222.222.222
Apply changes by restarting CSF from the shell:
csf -r
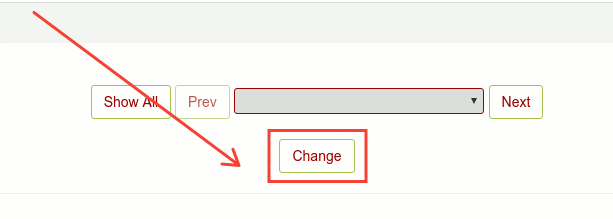
Or click on ‘Change’ at the footer of your CSF Configuration page in WHM.

Verify your remote connectivity
Open a new SSH terminal and try to login to your server via WHM, cPanel and SSH. If everything goes well, then your firewall rules are working as expected.
Otherwise, if you get locked out of your server, you just have to wait 5 minutes and you will be able to login back.
Disable CSF Testing Mode
Login to your cPanel server’s WHM interface, move to:
WHM » Plugins » ConfigServer Security and Firewall » Firewall Configuration
You will see the firewall is stopped, because TESTING mode was active. Now we will disable testing mode by settings:
TESTING = "0"
Now, move down and click on ‘Change’ to apply changes.
Verify CSF is working
In order to verify if csf is running well, move to:
WHM > Config Security & Firewall > Status: Running
You will see ‘Status: Running’, as shown in the image below:

DDOS protection and mitigation
If you are facing a DOS or DDOS attacks against your server, you can try to mitigate it by altering variables like SYNFLOOD and PORTFLOOD.
Be aware that you won’t be able to fully stop the attack, but to mitigate it, only if it is a small attack, for large attacks you will need solutions like AWS AntiDDOS shield, Cloudflare DDOS, F5 antiddos, Radware, etc.
Synflood connection can be enabled using:
SYNFLOOD = "1"
SYNFLOOD_RATE = "60/s"
SYNFLOOD_BURST = "10"
Portflood can also be enabled:
PORTFLOOD = "80;tcp;80;5"
To fully understand this configurations you can out our CSF DDOS mitigation configuration here: anti DDOS mitigation using CSF Firewall.
Update CSF to latest version
You can manually update it by running:
csf --update
This is the output if you are already running the latest version:
[[email protected]:~]csf --update
csf is already at the latest version: v9.30
[[email protected]:~]
You can also configure auto-update on csf.conf. Enabling auto updates creates a cron job called /etc/cron.d/csf_update which runs once per day to see if there is an update to csf+lfd and upgrades if available and restarts csf and lfd.
AUTO_UPDATES = "1"
CSF Configuration Files
After you finish the Install CSF Firewall on cPanel process, there is one extra thing to have in mind. If you like to edit the firewall rules, allow or deny using the Linux shell instead of WHM you can find the main CSF config files at this locations:
/etc/csf/csf.conf – Main CSF Firewall configuration file
/etc/csf/csf.allow – Config file to allow IPs
/etc/csf/csf.deny – Config file to deny IPs
/etc/csf/ – Alert files with TXT extension are stored within this directory
It is always useful to know how to manage CSF from the Linux shell in case you miss your WHM access or can not load it from your browser.
There is a large help file built inside CSF firewall, which can be retrieved using the ‘csf’ command, as you see below:
[[email protected]:~]csf
csf: v9.30 (cPanel)

NAME
 csf - ConfigServer & Security Firewall

SYNOPSIS
 csf [OPTIONS]

OPTIONS
 -h, --help
 Show this message

 -l, --status
 List/Show the IPv4 iptables configuration

 -l6, --status6
 List/Show the IPv6 ip6tables configuration

 -s, --start
 Start the firewall rules

 -f, --stop
 Flush/Stop firewall rules (Note: lfd may restart csf)

 -r, --restart
 Restart firewall rules (csf)

 -q, --startq
 Quick restart (csf restarted by lfd)

 -sf, --startf
 Force CLI restart regardless of LFDSTART setting

 -ra, --restartall
 Restart firewall rules (csf) and then restart lfd daemon. Both
 csf and then lfd should be restarted after making any changes to
 the configuration files

 --lfd [stop|start|restart|status]
 Actions to take with the lfd daemon

 -a, --add ip [comment]
 Allow an IP and add to /etc/csf/csf.allow

 -ar, --addrm ip
 Remove an IP from /etc/csf/csf.allow and delete rule

 -d, --deny ip [comment]
 Deny an IP and add to /etc/csf/csf.deny

 -dr, --denyrm ip
 Unblock an IP and remove from /etc/csf/csf.deny

 -df, --denyf
 Remove and unblock all entries in /etc/csf/csf.deny

 -g, --grep ip
 Search the iptables and ip6tables rules for a match (e.g. IP,
 CIDR, Port Number)

 -i, --iplookup ip
 Lookup IP address geographical information using CC_LOOKUPS set-
 ting in /etc/csf/csf.conf

 -t, --temp
 Displays the current list of temporary allow and deny IP entries
 with their TTL and comment

 -tr, --temprm ip
 Remove an IP from the temporary IP ban or allow list

 -td, --tempdeny ip ttl [-p port] [-d direction] [comment]
 Add an IP to the temp IP ban list. ttl is how long to blocks for
 (default:seconds, can use one suffix of h/m/d). Optional port.
 Optional direction of block can be one of: in, out or inout
 (default:in)

 -ta, --tempallow ip ttl [-p port] [-d direction] [comment]
 Add an IP to the temp IP allow list (default:inout)

 -tf, --tempf
 Flush all IPs from the temporary IP entries

 -cp, --cping
 PING all members in an lfd Cluster

 -cg, --cgrep ip
 Requests the --grep output for IP from each member in an lfd
 Cluster

 -cd, --cdeny ip [comment]
 Deny an IP in a Cluster and add to each remote /etc/csf/csf.deny

 -ctd, --ctempdeny ip ttl [-p port] [-d direction] [comment]
 Add an IP in a Cluster to the temp IP ban list (default:in)

 -cr, --crm ip
 Unblock an IP in a Cluster and remove from each remote
 /etc/csf/csf.deny and temporary list

 -ca, --callow ip [comment]
 Allow an IP in a Cluster and add to each remote
 /etc/csf/csf.allow

 -cta, --ctempallow ip ttl [-p port] [-d direction] [comment]
 Add an IP in a Cluster to the temp IP allow list (default:in)

 -car, --carm ip
 Remove allowed IP in a Cluster and remove from each remote
 /etc/csf/csf.allow and temporary list

 -cc, --cconfig [name] [value]
 Change configuration option [name] to [value] in a Cluster

 -cf, --cfile [file]
 Send [file] in a Cluster to /etc/csf/

 -crs, --crestart
 Cluster restart csf and lfd

 -w, --watch ip
 Log SYN packets for an IP across iptables chains

 -m, --mail [email]
 Display Server Check in HTML or email to [email] if present

 --rbl [email]
 Process and display RBL Check in HTML or email to [email] if
 present

 -lr, --logrun
 Initiate Log Scanner report via lfd

 -p, --ports
 View ports on the server that have a running process behind them
 listening for external connections

 --graphs [graph type] [directory]
 Generate System Statistics html pages and images for a given
 graph type into a given directory. See ST_SYSTEM for require-
 ments

 --profile [command] [profile|backup] [profile|backup]
 Configuration profile functions for /etc/csf/csf.conf
 You can create your own profiles using the examples provided in
 /usr/local/csf/profiles/
 The profile reset_to_defaults.conf is a special case and will
 always be the latest default csf.conf

 list
 Lists available profiles and backups

 apply [profile]
 Modify csf.conf with Configuration Profile

 backup "name"
 Create Configuration Backup with optional "name" stored in
 /var/lib/csf/backup/

 restore [backup]
 Restore a Configuration Backup

 keep [num]
 Remove old Configuration Backups and keep the latest [num]

 diff [profile|backup] [profile|backup]
 Report differences between Configuration Profiles or Configura-
 tion Backups, only specify one [profile|backup] to compare to
 the current Configuration

 -c, --check
 Check for updates to csf but do not upgrade

 -u, --update
 Check for updates to csf and upgrade if available

 -uf Force an update of csf whether and upgrade is required or not

 -x, --disable
 Disable csf and lfd completely

 -e, --enable
 Enable csf and lfd if previously disabled

 -v, --version
 Show csf version
Uninstall CSF Firewall
If you ever need to uninstall csf firewall, you can do it by running this command from your Linux shell:
sh /etc/csf/uninstall.sh
Allow static IPs
You can easily allow static IPs and full IP ranges by running:
csf -a XX.XX.XX.XX
Where XX.XX.XX.XX is the IP address.
Allow dynamic DNS / Hostnames
Sometimes you don’t have any static IP on your home or office, and instead you are using a dynamic IP. Lucky you, there is a way to whitelist / allow dynamic IPs in csf using no-ip service.
This can be achieved using the “Allow Dynamic DNS IP addresses” option on csf.conf. This option will always allow your IP, even if it changes when you connect again to the internet.
Follow this steps to allow dynamic ips on CSF Firewall:
Get a free account at no-ip.com & configure your hostname for your dynamic IP.
Install the no-ip.com client on your local computer at your home or office and configure it properly.
Move to the server, and open up /etc/csf/csf.dyndns:
nano -w /etc/csf/csf.dyndns
Paste your hostname inside at the end of the file.
Edit csf.conf file and set DYNDNS check time. Set:
DYNDNS = "240"
This will check for your new IP address changes every 4 minutes.
On the same file csf.conf, search for “DYNDNS_IGNORE” variable, and set it to “1”, as you see below:
DYNDNS_IGNORE = "1"
This will always ignore all requests coming from DYNDNS IPs and avoid unnecessary blockings.
Restart CSF to apply the changes:
csf -r
Conclusion
At this point now you have enough knowledge to Install CSF Firewall on cPanel servers.
As you see, CSF Firewall is one of the most complete security suites for your cPanel and plain CentOS/RHEL servers. It can be configured easily in just a few minutes, you just need to follow every step carefully and always set TESTING mode to ON to avoid getting locked out of your server. Once you are confident after configuring CSF many times, you can start setting TESTING to OFF by default.
Now that you know how to install CSF firewall on cPanel, stay tuned, we will soon start writing about: Advanced CSF Firewall Configurations, CSF Anti-DDOS Configuration and much more.