Hello Techies, Rocky Linux 8.4 has been released officially by Rocky Enterprise Software Foundation (RESF). It is considered as the replacement of CentOS Linux. Rock Linux is community-based enterprise level operating system and compatible with RHEL (Red Hat Enterprise Linux). As CentOS 8 updates will not be available the after end of Dec 2021 and if you are looking for production grade operating system then Rocky Linux can be considered.
In this guide, we will cover the installation steps of Rocky Linux 8.4. Before jump into the installation steps, let’s see the minimum system requirements for Rocky Linux.
- 2 GB RAM or more
- 20 GB hard disk or more
- 2 CPU / vCPUs (1.1 GHz processor)
- Internet Connection (optional)
- Bootable media (USB / DVD)
Let’s dive into the installation steps of Rocky Linux 8.4
Step 1) Download Rock Linux 8.4 ISO file
Download the ISO file of Rocky Linux from their official web site.
Once the ISO file is downloaded then burn it either into USB or DVD to make the bootable media. In Linux use following to create bootable media:
How to Create Bootable USB Drive on Ubuntu / Linux Mint
Step 2) Boot the system with bootable media
Reboot the target system and go to it’s bios settings and change the boot medium from hard disk to media like USB / DVD.
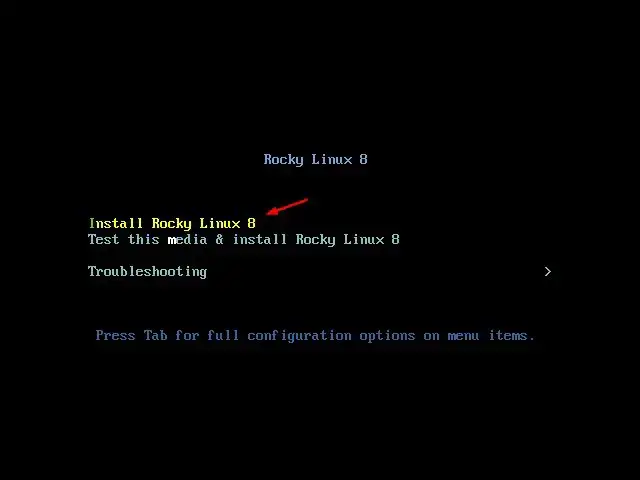
Once the system boots up with bootable media of Rocky Linux then we will get the following screen.

Choose the first option ‘Install Rocky Linux 8’ and then hit enter.
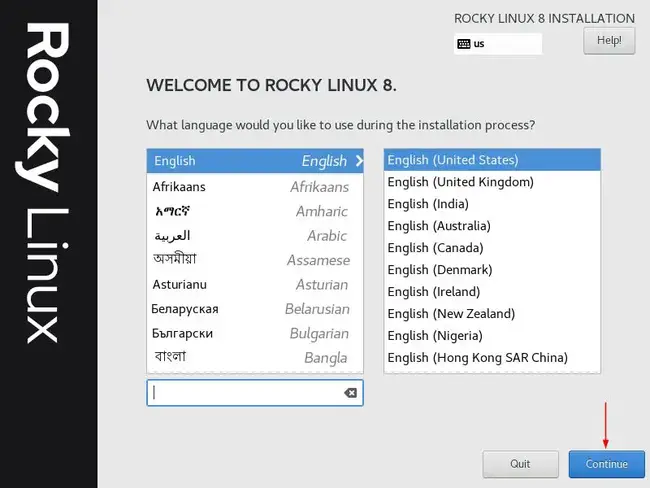
Step 2) Choose Preferred Language for the installation
Select the language that suits to your installation and then click on ‘continue’

Step 3) Installation Summary
We will get the following initial default installation summary screen,

So, pick each item and do the selection that suits to your environment. To set or change the keyboard layout click on Keyboard icon and choose the preferred keyboard layout and then click on ‘Done’

Set Date and Time Zone
To configure date and time, click on ‘Date & Time’ icon and Choose the time zone

Installation Destination
Click on ‘Installation Destination’ icon and choose how you want to configure partitions on the storage. We have two options here,
- Automatic – In this option, installer will automatically create partitions on the disk.
- Custom – In this option, you will get luxury to create own custom partitions.
In this guide, we will go with custom option and will demonstrate how to create custom partitions on 64 GB disk.

Click on ‘Done’ and then we will get the following screen.
Let’s create our first partition as /boot of size 2 GB with ext4 file system.
Select ‘Standard Partition’ and the click on + symbol and in pop up window specify mount point as /boot and desired capacity as 2 G.

Click on ‘Add mount point’ and then change the file system to ext4 from xfs and then click on ‘Update Settings’

Create the next partition as /home of size 30 GB and file system as ext4
Click on + symbol and then specify the mount point as /home and desired capacity as 30 G

Click on ‘Add mount point’
Similarly create /root and /var partitions of size 20 GB and 10 GB respectively.


Now create the last partition as swap of size 2 GB

Click on ‘Add mount point’ and then click on ‘Done’ to proceed further

In the next screen, choose ‘Accept Changes’ to write the changes to the disk

Now we are back on the installation summary screen, if you wish to configure network then click on ‘Network and Hostname’ icon.

Click on ‘Done’ to go back to installation summary screen
In case you want to choose the preferred Base Environment then click on ‘Software Selection’. In my case I am selecting ‘Server with GUI’

Click on Done.
Now set the root user password by choosing ‘Root Password’ icon

Mentioned the root password twice that you want to set and then click on Done.
Create Local user account by selecting ‘User Creation’ icon

Click on Done to go back to previous screen,
Step 4) Begin Rocky Linux Installation
Now at this step, we are ready to start Rocky Linux installation, click on ‘Begin Installation’ icon

As we can see below, Installation has been started and is in progress.

Once the Installation is completed successfully then installer will prompt to reboot the system once.

Click on ‘Reboot System’
Step 5) Login Screen After Installation
After reboot, don’t forget to change boot medium from USB / DVD to hard disk from the bios settings so that system boots up with newly installed Rocky Linux.
When the system boots up accept Rocky Linux license.

Click on Done to proceed further.
Now click on ‘Finish Configuration’

We will get the following login screen, use the same user credentials that we have created during the installation.

After entering the credentials we will get the following desktop screen


Perfect, Above confirms that Installation has been completed successfully. That’s all from guide, I hope you have found this guide informative. In case you have any doubts and queries, please write it in the comments section below.
source: https://www.linuxtechi.com/rocky-linux-8-installation-steps-screenshots/